The Basics of the Unix Shell#
Ninety percent of most magic merely consists of knowing one extra fact.
— Terry Pratchett
Computers do four basic things: store data, run programs, talk with each other, and interact with people. They do the interacting in many different ways, of which graphical user interfaces (GUIs) are the most widely used. The computer displays icons to show our files and programs, and we tell it to copy or run those by clicking with a mouse. GUIs are easy to learn but hard to automate, and don’t create a record of what we did.
In contrast, when we use a command-line interface (CLI) we communicate with the computer by typing commands, and the computer responds by displaying text. CLIs existed long before GUIs; they have survived because they are efficient, easy to automate, and automatically record what we have done.
The heart of every CLI is a read-evaluate-print loop (REPL). When we type a command and press Return (also called Enter) the CLI reads the command, evaluates it (i.e., executes it), prints the command’s output, and loops around to wait for another command. If you have used an interactive console for Python, you have already used a simple CLI.
This lesson introduces another CLI that lets us interact with our computer’s operating system. It is called a “command shell”, or just shell for short, and in essence is a program that runs other programs on our behalf. Those “other programs” can do things as simple as telling us the time or as complex as modeling global climate change; as long as they obey a few simple rules, the shell can run them without having to know what language they are written in or how they do what they do.

What’s in a Name?
Programmers have written many different shells over the last forty years, just as they have created many different text editors and plotting packages. The most popular shell today is called Bash (an acronym of Bourne Again SHell, and a weak pun on the name of its predecessor, the Bourne shell). Other shells may differ from Bash in minor ways, but the core commands and ideas remain the same. In particular, the most recent versions of MacOS use a shell called the Z Shell or
zsh; we will point out a few differences as we go along.
The following pages document how to install and configure your local environment so you can follow along with this book.
If you are reading this within JupyterLab, you can launch a Terminal / Shell Session by
opening a launcher tab (click on the + sign on the right side of the tabs). Then
click on the Terminal icon under the “Other” section.
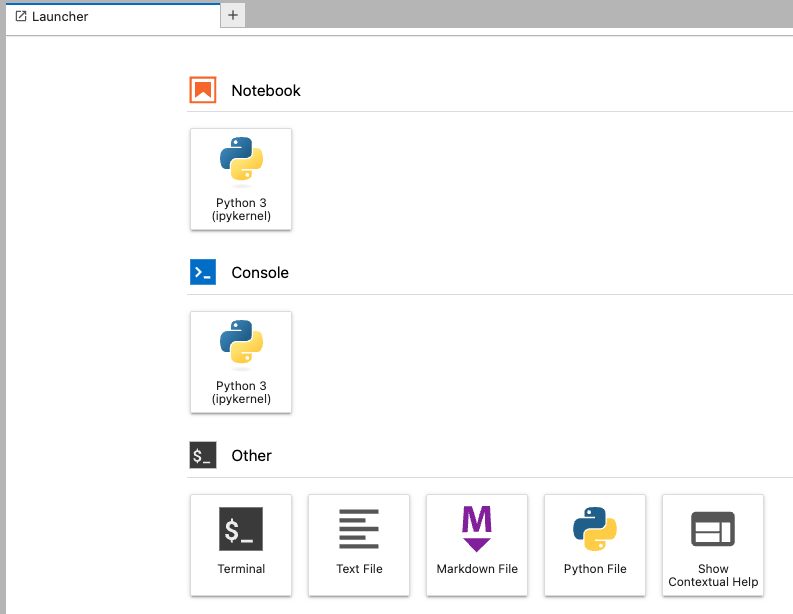
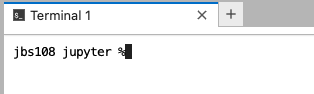
This will open a new tab that will look like -
Exploring Files and Directories#
Our first shell commands will let us explore our folders and files, and will also introduce us to several conventions that most Unix tools follow. To start, when Bash runs it presents us with a prompt to indicate that it is waiting for us to type something. This prompt is a simple dollar sign by default:
$
However,
different shells may use a different symbol:
in particular,
the zsh shell, which is the default on newer versions of MacOS, uses %.
As we’ll see in the section “Configuring the Shell, we can customize the prompt to give us more information.
Don’t Type the Dollar Sign
We show the
$prompt so that it’s clear what you are supposed to type, particularly when several commands appear in a row, but you should not type it yourself.
Let’s run a command to find out who the shell thinks we are:
$ whoami
amira
Now that we know who we are,
we can explore where we are and what we have.
The part of the operating system that manages files and directories (also called folders)
is called the filesystem.
Some of the most commonly used commands in the shell create, inspect, rename, and delete files and directories.
Let’s start exploring them by running the command pwd (man page),
which stands for print working directory.
The “print” part of its name is straightforward;
the “working directory” part refers to the fact that
the shell keeps track of our current working directory at all times.
Most commands read and write files in the current working directory
unless we tell them to do something else,
so knowing where we are before running a command is important.
$ pwd
/Users/amira
Here,
the computer’s response is /Users/amira,
which tells us that we are in a directory called amira
that is contained in a top-level directory called Users.
This directory is Amira’s home directory;
to understand what that means,
we must first understand how the filesystem is organized.
On Amira’s computer
it looks like -
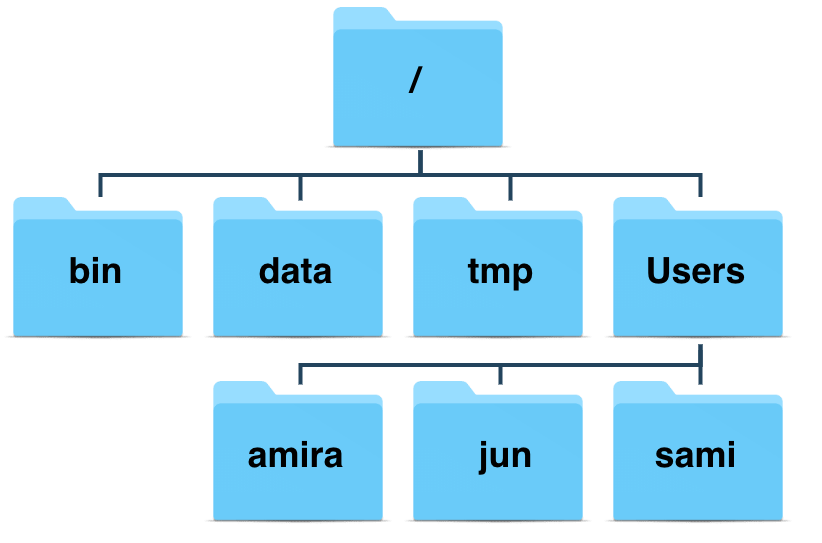
At the top is the root directory that holds everything else,
which we can refer to using a slash character / on its own.
Inside that directory are several other directories,
including bin (where some built-in programs are stored),
data (for miscellaneous data files),
tmp (for temporary files that don’t need to be stored long-term),
and Users (where users’ personal directories are located).
We know that /Users is stored inside the root directory / because its name begins with /,
and that our current working directory /Users/amira is stored inside /Users
because /Users is the first part of its name.
A name like this is called a path because it tells us
how to get from one place in the filesystem (e.g., the root directory)
to another (e.g., Amira’s home directory).
Slashes
The
/character means two different things in a path. At the front of a path or on its own, it refers to the root directory. When it appears inside a name, it is a separator. Windows uses backslashes (\\) instead of forward slashes as separators.
Underneath /Users,
we find one directory for each user with an account on this machine.
Jun’s files are stored in /Users/jun,
Sami’s in /Users/sami,
and Amira’s in /Users/amira.
This is where the name “home directory” comes from:
when we first log in,
the shell puts us in the directory that holds our files.
Home Directory Variations
Our home directory will be in different places on different operating systems. On Linux it may be
/home/amira, and on Windows it may beC:\Documents and Settings\amiraorC:\Users\amira(depending on the version of Windows). Our examples show what we would see on MacOS.
Now that we know where we are,
let’s see what we have using the command ls (man page)
(short for “listing”),
which prints the names of the files and directories in the current directory:
$ ls
Applications   Downloads     Music        todo.txt
Desktop        Library       Pictures     zipf
Documents      Movies        Public
Again, our results may be different depending on our operating system and what files or directories we have.
We can make the output of ls more informative using the -F command-line option
(also sometimes called a switch or a flag).
Options are exactly like arguments to a function in Python;
in this case,
-F tells ls to decorate its output to show what things are.
A trailing / indicates a directory,
while a trailing * tells us something is a runnable program.
Depending on our setup,
the shell might also use colors to indicate whether each entry is a file or directory.
$ ls -F
Applications/   Downloads/     Music/        todo.txt
Desktop/        Library/       Pictures/     zipf/
Documents/      Movies/        Public/
Here,
we can see that almost everything in our home directory is a subdirectory;
the only thing that isn’t is a file called todo.txt.
Spaces Matter
1+2and1 + 2mean the same thing in mathematics, butls -Fandls-Fare very different things in the shell. The shell splits whatever we type into pieces based on spaces, so if we forget to separatelsand-Fwith at least one space, the shell will try to find a program calledls-Fand (quite sensibly) give an error message likels-F: command not found.
Some options tell a command how to behave,
but others tell it what to act on.
For example,
if we want to see what’s in the /Users directory,
we can type:
$ ls /Users
amira jun sami
We often call the file and directory names that we give to commands arguments to distinguish them from the built-in options. We can combine options and arguments:
$ ls -F /Users
amira/ jun/ sami/
but we must put the options (like -F)
before the names of any files or directories we want to work on,
because once the command encounters something that isn’t an option
it assumes there aren’t any more:
$ ls /Users -F
ls: -F: No such file or directory
amira   jun     sami
Command Line Differences
Code can sometimes behave in unexpected ways on different computers, and this applies to the command line as well. For example, the following code actually does work on some Linux operating systems:
$ ls /Users -FSome people think this is convenient; others (including us) believe it is confusing, so it’s best to avoid doing this.
Moving Around#
Let’s run ls again.
Without any arguments,
it shows us what’s in our current working directory:
$ ls -F
Applications/   Downloads/     Music/        todo.txt
Desktop/        Library/       Pictures/     zipf/
Documents/      Movies/        Public/
If we want to see what’s in the zipf directory
we can ask ls to list its contents:
$ ls -F zipf
data/
Notice that zipf doesn’t have a leading slash before its name.
This absence tells the shell that it is a relative path,
i.e.,
that it identifies something starting from our current working directory.
In contrast,
a path like /Users/amira is an absolute path
it is always interpreted from the root directory down,
so it always refers to the same thing.
Using a relative path is like telling someone to go two kilometers north and then half a kilometer east;
using an absolute path is like giving them the latitude and longitude of their destination.
We can use whichever kind of path is easiest to type,
but if we are going to do a lot of work with the data in the zipf directory,
the easiest thing would be to change our current working directory
so that we don’t have to type zipf over and over again.
The command to do this is cd (man page),
which stands for change directory.
This name is a bit misleading because the command doesn’t change the directory;
instead, it changes the shell’s idea of what directory we are in.
Let’s try it out:
$ cd zipf
cd doesn’t print anything.
This is normal:
many shell commands run silently unless something goes wrong,
on the theory that they should only ask for our attention when they need it.
To confirm that cd has done what we asked,
we can use pwd:
$ pwd
/Users/amira/zipf
$ ls -F
data/
Missing Directories and Unknown Options
If we give a command an option that it doesn’t understand, it will usually print an error message, and (if we’re lucky) tersely remind us of what we should have done:
$ cd -j-bash: cd: -j: invalid option cd: usage: cd [-L|-P] [dir]On the other hand, if we get the syntax right but make a mistake in the name of a file or directory, it will tell us that:
$ cd whoops-bash: cd: whoops: No such file or directory
We now know how to go down the directory tree, but how do we go up? This doesn’t work:
$ cd amira
cd: amira: No such file or directory
because amira on its own is a relative path meaning
“a file or directory called amira below our current working directory.”
To get back home,
we can either use an absolute path:
$ cd /Users/amira
or a special relative path called .. (two periods in a row with no spaces),
which always means “the directory that contains the current one.”
The directory that contains the one we are in is called the parent directory,
and sure enough,
.. gets us there:
$ cd ..
$ pwd
/Users/amira
ls usually doesn’t show us this special directory—since it’s always there,
displaying it every time would be a distraction.
We can ask ls to include it using the -a option,
which stands for “all”.
Remembering that we are now in /Users/amira:
$ ls -F -a
./              Documents/     Music/        zipf/
../             Downloads/     Pictures/
Applications/   Library/       Public/
Desktop/        Movies/        todo.txt
The output also shows another special directory called . (a single period),
which refers to the current working directory.
It may seem redundant to have a name for it,
but we’ll see some uses for it soon.
Combining Options
You’ll occasionally need to use multiple options in the same command. In most command-line tools, multiple options can be combined with a single
-and no spaces between the options:$ ls -FaThis command is synonymous with the previous example. While you may see commands written like this, we don’t recommend you use this approach in your own work. This is because some commands take long options with multi-letter names, and it’s very easy to mistake
--no(meaning “answer ‘no’ to all questions”) with-no(meaning-n -o).
The special names . and .. don’t belong to cd:
they mean the same thing to every program.
For example,
if we are in /Users/amira/zipf,
then ls .. will display a listing of /Users/amira.
When the meanings of the parts are the same no matter how they’re combined,
programmers say they are orthogonal.
Such systems tend to be easier for people to learn
because there are fewer special cases to remember.
Other Hidden Files
In addition to the hidden directories
..and., we may also come across files with names like.jupyter. These usually contain settings or other data for particular programs; the prefix.is used to preventlsfrom cluttering up the output when we runls. We can always use the-aoption to display them.
cd is a simple command,
but it allows us to explore several new ideas.
First,
several .. can be joined by the path separator
to move higher than the parent directory in a single step.
For example, cd ../.. will move us up two directories
(e.g., from /Users/amira/zipf to /Users),
while cd ../Movies will move us up from zipf and back down into Movies.
What happens if we type cd on its own without giving a directory?
$ pwd
/Users/amira/Movies
$ cd
$ pwd
/Users/amira
No matter where we are,
cd on its own always returns us to our home directory.
We can achieve the same thing using the special directory name ~,
which is a shortcut for our home directory: more info
$ ls ~
Applications   Downloads     Music        todo.txt
Desktop        Library       Pictures     zipf
Documents      Movies        Public
(ls doesn’t show any trailing slashes here because we haven’t used -F.)
We can use ~ in paths,
so that (for example) ~/Downloads always refers to our download directory.
Finally,
cd interprets the shortcut - (a single dash) to mean the last directory we were in.
Using this is usually faster and more reliable than trying to remember and type the path,
but unlike ~,
it only works with cd:
ls - tries to print a listing of a directory called -
rather than showing us the contents of our previous directory.
Creating New Files and Directories#
We now know how to explore files and directories,
but how do we create them?
To find out,
let’s go back to our zipf directory:
$ cd ~/zipf
$ ls -F
data/
To create a new directory,
we use the command mkdir (short for make directory): (man page)
$ mkdir docs
Since docs is a relative path
(i.e., does not have a leading slash)
the new directory is created below the current working directory:
$ ls -F
data/ docs/
Using the shell to create a directory is no different than using a graphical tool.
If we look at the current directory with our computer’s file browser
we will see the docs directory there too.
The shell and the file explorer are two different ways of interacting with the files;
the files and directories themselves are the same.
Naming Files and Directories
Complicated names of files and directories can make our life painful. Following a few simple rules can save a lot of headaches:
Don’t use spaces. Spaces can make a name easier to read, but since they are used to separate arguments on the command line, most shell commands interpret a name like
My Thesisas two namesMyandThesis. Use-or_instead, e.g.,My-ThesisorMy_Thesis.Don’t begin the name with
-(dash) to avoid confusion with command options like-F.Stick with letters, digits,
.(period or ‘full stop’),-(dash) and_(underscore). Many other characters mean special things in the shell. We will learn about some of those special characters during this lesson, but the characters cited here are always safe.If we need to refer to files or directories that have spaces or other special characters in their names, we can surround the name in quotes (
""). For example,ls "My Thesis"will work wherels My Thesisdoes not.
Since we just created the docs directory,
ls doesn’t display anything when we ask for a listing of its contents:
$ ls -F docs
Let’s change our working directory to docs using cd,
then use a very simple text editor called Nano to create a file called draft.txt:
$ cd docs
$ nano draft.txt

When we say “Nano is a text editor” we really do mean “text”: it can only work with plain character data, not spreadsheets, images, Microsoft Word files, or anything else invented after 1970. We use it in this lesson because it runs everywhere, and because it is as simple as something can be and still be called an editor. However, that last trait means that we shouldn’t use it for larger tasks like writing a program or a paper.
Recycling Pixels
Unlike most modern editors, Nano runs inside the shell window instead of opening a new window of its own. This is a holdover from an era when graphical terminals were a rarity and different applications had to share a single screen.
Once Nano is open we can type in a few lines of text,
then press Ctrl+O
(the Control key and the letter ‘O’ at the same time)
to save our work.
Nano will ask us what file we want to save it to;
press Return to accept the suggested default of draft.txt.
Once our file is saved,
we can use Ctrl+X to exit the editor and return to the shell.
Control, Ctrl, or ^ Key
The Control key, also called the “Ctrl” key, can be described in a bewildering variety of ways. For example, Control plus X may be written as:
Control-X
Control+X
Ctrl-X
Ctrl+X
C-x
^XWhen Nano runs, it displays some help in the bottom two lines of the screen using the last of these notations: for example,
^G Get Helpmeans “use Ctrl+G to get help” and^O WriteOutmeans “use Ctrl+O to write out the current file.”
Nano doesn’t leave any output on the screen after it exits,
but ls will show that we have indeed created a new file draft.txt:
$ ls
draft.txt
Dot Something
All of Amira’s files are named “something dot something.” This is just a convention: we can call a file
mythesisor almost anything else. However, both people and programs use two-part names to help them tell different kinds of files apart. The part of the filename after the dot is called the filename extension and indicates what type of data the file holds:.txtfor plain text,.pngfor a PNG image, and so on. This is just a convention: saving a PNG image of a whale aswhale.mp3doesn’t somehow magically turn it into a recording of whalesong, though it might cause the operating system to try to open it with a music player when someone double-clicks it.
Moving Files and Directories#
Let’s go back to our zipf directory:
cd ~/zipf
The docs directory contains a file called draft.txt.
That isn’t a particularly informative name,
so let’s change it using mv (short for move): (man page)
$ mv docs/draft.txt docs/prior-work.txt
The first argument tells mv what we are “moving”,
while the second is where it’s to go.
“Moving” docs/draft.txt to docs/prior-work.txt
has the same effect as renaming the file:
$ ls docs
prior-work.txt
We must be careful when specifying the destination
because mv will overwrite existing files without warning.
An option -i (for “interactive”) makes mv ask us for confirmation before overwriting.
mv also works on directories,
so mv analysis first-paper would rename the directory without changing its contents.
Now suppose we want to move prior-work.txt into the current working directory.
If we don’t want to change the file’s name,
just its location,
we can provide mv with a directory as a destination
and it will move the file there.
In this case,
the directory we want is the special name . that we mentioned earlier:
$ mv docs/prior-work.txt .
ls now shows us that docs is empty:
$ ls docs
and that our current directory now contains our file:
$ ls
data/ docs/ prior-work.txt
If we only want to check that the file exists,
we can give its name to ls
just like we can give the name of a directory:
$ ls prior-work.txt
prior-work.txt
Copying Files and Directories#
The cp command copies files. (man page)
It works like mv except it creates a file instead of moving an existing one:
$ cp prior-work.txt docs/section-1.txt
We can check that cp did the right thing
by giving ls two arguments
to ask it to list two things at once:
$ ls prior-work.txt docs/section-1.txt
docs/section-1.txt prior-work.txt
Notice that ls shows the output in alphabetical order.
If we leave off the second filename and ask it to show us a file and a directory
(or multiple directories)
it lists them one by one:
$ ls prior-work.txt docs
prior-work.txt

docs:
section-1.txt
Copying a directory and everything it contains is a little more complicated.
If we use cp on its own,
we get an error message:
$ cp docs backup
cp: docs is a directory (not copied).
If we really want to copy everything,
we must give cp the -r option (meaning \gref{recursive}{recursion}):
$ cp -r docs backup
Once again we can check the result with ls:
$ ls docs backup
docs/:
section-1.txt

backup/:
section-1.txt
Copying Files to and from Remote Computers
For many researchers and developers, a motivation for learning how to use the shell is that it’s often the only way to connect to a remote computer (e.g., located at a supercomputing facility or in a university department).
Similar to the
cpcommand, there exists a secure copy (scp) command for copying files between computers. (man page)TODO: ADD NOTES ON CONNECTING TO REMOTE COMPUTERS via SSH
Deleting Files and Directories#
Let’s tidy up by removing the prior-work.txt file we created in our zipf directory.
The command to do this is rm (for remove): (man page)
$ rm prior-work.txt
We can confirm the file is gone using ls:
$ ls prior-work.txt
ls: prior-work.txt: No such file or directory
Deleting is forever: unlike most GUIs, the Unix shell doesn’t have a trash bin that we can recover deleted files from. Tools for finding and recovering deleted files do exist, but there is no guarantee they will work, since the computer may recycle the file’s disk space at any time. In most cases, when we delete a file it really is gone.
In a half-hearted attempt to stop us from erasing things accidentally,
rm refuses to delete directories:
$ rm docs
rm: docs: is a directory
We can tell rm we really want to do this
by giving it the recursive option -r:
$ rm -r docs
rm -r should be used with great caution:
in most cases,
it’s safest to add the -i option (for interactive)
to get rm to ask us to confirm each deletion.
As a halfway measure,
we can use -v (for verbose)
to get rm to print a message for each file it deletes.
This option works the same way with mv and cp.
File Attributes#
In addition to the file (or directory) name, the Linux file system, maintains a number of
additional attributes for each file. If you execute ls -la you can see the long listing for a directory (-l) and as well as hidden files (-a):
(venv) ORIED-M1XC712JYJ:zipf amira$ ls -la
total 104
drwxr-xr-x  19 amira  staff   608 Dec  3 22:19 .
drwxr-xr-x   3 amira  staff    96 Dec  3 20:02 ..
-rw-r--r--   1 amira  staff    12 Dec  3 22:19 .gitignore
-rw-r--r--   1 amira  staff   616 Dec  3 22:19 CITATION.md
-rw-r--r--   1 amira  staff  5228 Dec  3 22:19 CONDUCT.md
-rw-r--r--   1 amira  staff   539 Dec  3 22:19 CONTRIBUTING.md
-rw-r--r--   1 amira  staff   482 Dec  3 22:19 KhanVirtanen2020.md
-rw-r--r--   1 amira  staff  1067 Dec  3 22:19 LICENSE.md
-rw-r--r--   1 amira  staff  1444 Dec  3 22:19 Makefile
-rw-r--r--   1 amira  staff  1677 Dec  3 22:19 README.rst
drwxr-xr-x@ 10 amira  staff   320 Dec  3 22:19 bin
drwxr-xr-x  10 amira  staff   320 Dec  3 20:02 data
drwxr-xr-x   6 amira  staff   192 Dec  3 22:19 docs
-rw-r--r--   1 amira  staff     6 Dec  3 22:19 environment.yml
-rw-r--r--   1 amira  staff    44 Dec  3 22:19 requirements.txt
-rw-r--r--   1 amira  staff    14 Dec  3 22:19 requirements_docs.txt
drwxr-xr-x  13 amira  staff   416 Dec  3 22:19 results
-rw-r--r--   1 amira  staff   430 Dec  3 22:19 setup.py
drwxr-xr-x   4 amira  staff   128 Dec  3 22:19 test_data
The first column (e.g. drwxr-xr-x) shows the file type, permissions, and possible a flag @ if additional attributes are available for the file type.
This can be broken down as follows:
File Type: The first character indicates the file type:
: Regular file
d : Directory
l : Symbolic link
and other special types
Permissions: The next nine characters are divided into three groups of three characters each, representing permissions for the user (owner), group, and others.
User (Owner) Permissions: The first three characters after the file type.
Group Permissions: The next three characters.
Others Permissions: The last three characters. Each set of three characters can include:
r : Read permission
w : Write permission
x : Execute permission
: No permission
For example, -rw-r–r– means:
The owner can read and write the file.
The group can only read the file.
Others can only read the file.
The second column contains the number of hard links to the file. A hard link is a direct pointer to the inode(special data structure that describes the object as well as the disk block locations of the corresponding data) of a file. Each file has at least one hard link, which is the filename itself. When you create additional hard links to a file, you create additional directory entries (aliases) that point to the same inode.
The third column (e.g. amira) specifies who owns the file while the fourth column (e.g. staff) specifies the group associated with the file.
The fifth column contains the the file size in bytes.
The sixth column contains when the file was last modified.
The last column contains the file name. . specifies the current directory, .. specifies the parent directory. Files starting with a . are normally
hidden and can only bee seen when using the -a flag with the ls command.
Changing File Permissions#
The chmod command is used to change file permissions. There are two ways to specify permissions: symbolic (using +, -, =) and numeric (using octal numbers).
Symbolic Method#
Add a permission:
chmod u+x file.txtu: User (owner)g: Groupo: Othersa: All (user, group, others)+: Add the permission-: Remove the permission=: Set the exact permission
Example: Add execute permission for the owner:
chmod u+x file.txt
Remove a permission:
chmod g-w file.txtExample: Remove write permission for the group:
chmod g-w file.txt
Set exact permissions:
chmod o=r file.txtExample: Set read-only permission for others:
chmod o=r file.txt
Numeric Method#
File permissions can also be represented using octal (base-8) numbers. Each permission type (read, write, execute) is assigned a number:
r(read) = 4w(write) = 2x(execute) = 1
The permissions are summed to get the desired setting. For example:
7(rwx) = 4 + 2 + 16(rw-) = 4 + 25(r-x) = 4 + 14(r–) = 43(wx) = 2 + 12(w-) = 21(x) = 10(no permissions) = 0
When using chmod, you specify permissions for the user, group, and others as a three-digit number.
Example: Set read and write permissions for the owner, read-only for the group, and no permissions for others:
chmod 640 file.tx
Wildcards#
zipf/data contains the text files for several ebooks
from [Project Gutenberg][project-gutenberg]:
$ ls data
README.md         moby_dick.txt
dracula.txt       sense_and_sensibility.txt
frankenstein.txt  sherlock_holmes.txt
jane_eyre.txt     time_machine.txt
The wc command (short for word count) (man page)
tells us how many lines, words, and letters there are in one file:
$ wc data/moby_dick.txt
22331 215832 1276222 data/moby_dick.txt
What’s in a Word?
wconly considers spaces to be word breaks: if two words are connected by a long dash—like “dash” and “like” in this sentence—thenwcwill count them as one word.
We could run wc more times to find out how many lines there are in the other files,
but that would be a lot of typing
and we could easily make a mistake.
We can’t just give wc the name of the directory as we do with ls:
$ wc data
wc: data: read: Is a directory
Instead,
we can use wildcards to specify a set of files at once.
The most commonly used wildcard is * (a single asterisk).
It matches zero or more characters,
so data/*.txt matches all of the text files in the data directory:
$ ls data/*.txt
data/dracula.txt       data/sense_and_sensibility.txt
data/frankenstein.txt  data/sherlock_holmes.txt
data/jane_eyre.txt     data/time_machine.txt
data/moby_dick.txt
while data/s*.txt only matches the two whose names begin with an ‘s’:
$ ls data/s*.txt
data/sense_and_sensibility.txt data/sherlock_holmes.txt
Wildcards are expanded to match filenames before commands are run,
so they work exactly the same way for every command.
This means that we can use them with wc to (for example)
count the number of words in the books with names that contain an underscore:
$ wc data/*_*.txt
  21054  188460 1049294 data/jane_eyre.txt
  22331  215832 1253891 data/moby_dick.txt
  13028  121593  693116 data/sense_and_sensibility.txt
  13053  107536  581903 data/sherlock_holmes.txt
   3582   35527  200928 data/time_machine.txt
  73048  668948 3779132 total
or the number of words in Frankenstein:
$ wc data/frank*.txt
7832 78100 442967 data/frankenstein.txt
The exercises will introduce and explore other wildcards. For now, we only need to know that it’s possible for a wildcard expression to not match anything. In this case, the command will usually print an error message:
$ wc data/*.csv
wc: data/*.csv: open: No such file or directory
Accessing Remote Computers#
To access remote computers (servers) from your current machine, most likely you will use ssh (man page).
$ ssh username@remote_host
SSH has the ability to use a number of different authentication methods. While in many cases you can use a password, many other environments require the use of SSH keys pairs. Under this authentication method, you’ll generate an SSH key pair, and provide the “public” portion of the key that will be placed on the server. As you authentication onto the server, the server issues a challenge to your computer. Using your local private key, you’ll then create a response. The serve then validates that response came from you by using the public key to validate the response.
To generate an a ssh-key, ues the ssh-keygen utility:
~$ ssh-keygen
Generating public/private rsa key pair.
Enter file in which to save the key (/home/jbs108/.ssh/id_rsa):
Created directory '/home/jbs108/.ssh'.
Enter passphrase (empty for no passphrase):
Enter same passphrase again:
Your identification has been saved in /home/jbs108/.ssh/id_rsa
Your public key has been saved in /home/jbs108/.ssh/id_rsa.pub
The key fingerprint is:
SHA256:WzuNkQJiT7/nhztRa9dVEjSem+K6Nywt8GZlrE8xdZc jbs108@vcm-27655.vm.duke.edu
The key's randomart image is:
+---[RSA 3072]----+
|             .+. |
|             ..oo|
|    o o       +E+|
|   . + o   ... +o|
|      . S +o+.o..|
|        .=.**+. .|
|        oo=X+.   |
|         oX+*    |
|         o=X..   |
+----[SHA256]-----+
Note - you should use a passphrase to protect your private key. You will usually need to place or send the public key somewhere such that it can be placed on the remote server.
Reading the Manual#
wc displays lines, words, and characters by default,
but we can ask it to display only the number of lines:
$ wc -l data/s*.txt
  13028 sense_and_sensibility.txt
  13053 sherlock_holmes.txt
  26081 total
wc has other options as well.
We can use the man command (short for manual)
to find out what they are: man page
$ man wc
Paging through the Manual
If our screen is too small to display an entire manual page at once, the shell will use a paging program called
lessto show it piece by piece. (man page) We can use ↑ and ↓ to move line-by-line or Ctrl+Spacebar and Spacebar to skip up and down one page at a time. (B and F also work.)To search for a character or word, use / followed by the character or word to search for. If the search produces multiple hits, we can move between them using N (for “next”). To quit, press Q.
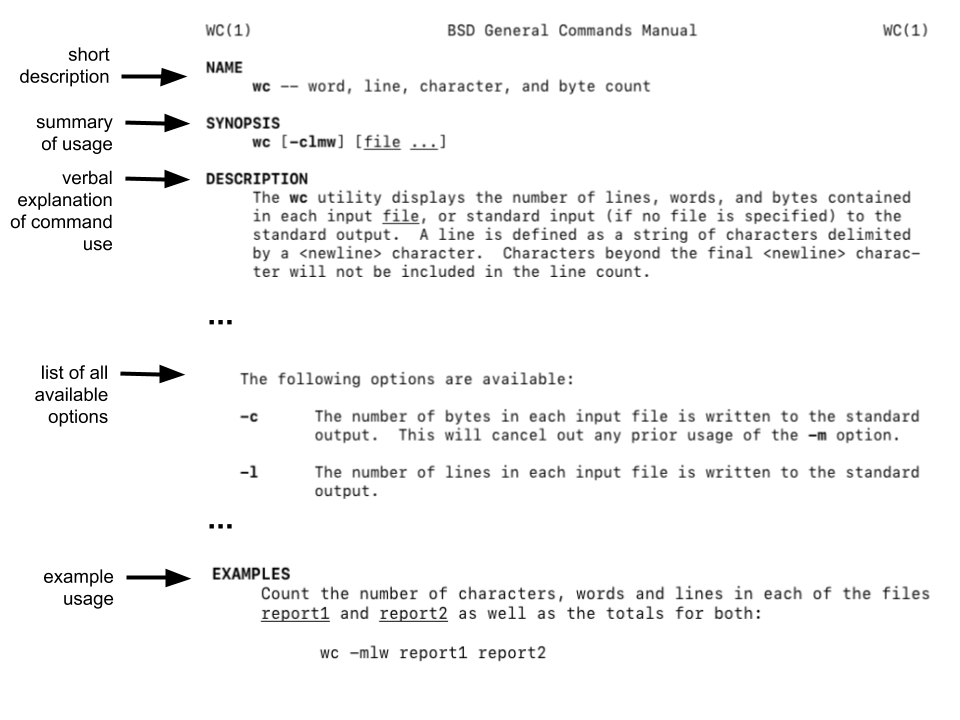
Manual pages contain a lot of information—often more than we really want. The below figure includes excerpts from the manual on your screen, and highlights a few of features useful for beginners.
Some commands have a --help option that provides a succinct summary of possibilities,
but the best place to go for help these days is probably the TLDR website.
The acronym stands for “too long, didn’t read,”
and its help for wc displays this:
wc
Count words, bytes, or lines.

Count lines in file:
wc -l {{file}}

Count words in file:
wc -w {{file}}

Count characters (bytes) in file:
wc -c {{file}}

Count characters in file (taking multi-byte character sets into
account):
wc -m {{file}}
Install tldr#
You can also install a local version of tldr.
MacOS#
Use brew to install tldr:
brew install tldr
Windows Subsystem for Linux#
The following commandes will install the tdlr command and then download the documentation library for the current user.
sudo apt instal tldr
tldr -u
we can search on Stack Overflow
or browse the GNU manuals
(particularly those for the core GNU utilities,
which include many of the commands introduced in this lesson).
In all cases,
though,
we need to have some idea of what we’re looking for in the first place:
someone who wants to know how many lines there are in a data file
is unlikely to think to look for wc.
Summary#
The original Unix shell is celebrating its fiftieth anniversary. Its commands may be cryptic, but few programs have remained in daily use for so long. The next chapter will explore how we can combine and repeat commands in order to create powerful, efficient workflows.
Exercises#
The exercises below involve creating and moving new files, as well as considering hypothetical files. Please note that if you create or move any files or directories in your Zipf’s Law project, you may want to reorganize your files following the outline at the beginning of the next chapter.
Note: The zipf directory should be available in the projects subdirectory that contains this
notebook if you cloned the git repository for this book.
Exploring more ls flags#
What does the command ls do when used
with the -l option?
What happens if you use two options at the same time, such as ls -l -h?
Listing recursively and by time#
The command ls -R lists the contents of directories recursively,
which means the subdirectories, sub-subdirectories, and so on at each level are listed.
The command ls -t lists things by time of last change,
with most recently changed files or directories first.
In what order does ls -R -t display things? Hint: ls -l uses a long listing
format to view timestamps.
Absolute and relative paths#
Starting from /Users/amira/data,
which of the following commands could Amira use to navigate to her home directory,
which is /Users/amira?
cd .cd /cd /home/amiracd ../..cd ~cd homecd ~/data/..cdcd ..cd ../.
Relative path resolution#
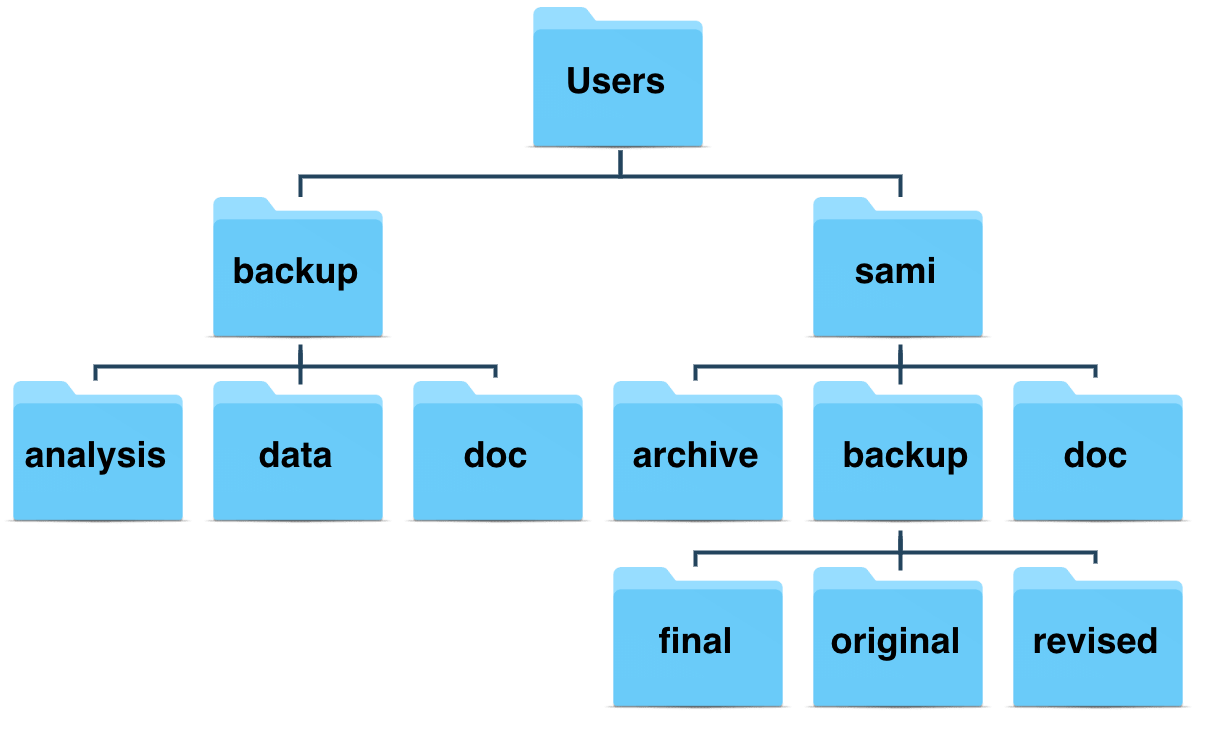
Using the filesystem shown in the figure,
if pwd displays /Users/sami,
what will ls -F ../backup display?
../backup: No such file or directoryfinal original revisedfinal/ original/ revised/data/ analysis/ doc/
ls reading comprehension#
Using the filesystem shown in the above figure,
if pwd displays /Users/backup,
and -r tells ls to display things in reverse order,
what command(s) will result in the following output:
doc/ data/ analysis/
ls pwdls -r -Fls -r -F /Users/backup
Creating files a different way#
What happens when you execute touch my_file.txt?
(Hint: use ls -l to find information about the file)
When might you want to create a file this way?
Using rm safely#
What would happen if you executed rm -i my_file.txt
on the file created in the previous exercise?
Why would we want this protection when using rm?
Moving to the current folder#
After running the following commands,
Amira realizes that she put the (hypothetical) files chapter1.txt and chapter2.txt into the wrong folder:
$ ls -F
data/ docs/
$ ls -F data
README.md			frankenstein.txt		sherlock_holmes.txt
chapter1.txt		jane_eyre.txt			time_machine.txt
chapter2.txt		moby_dick.txt
dracula.txt			sense_and_sensibility.txt
$ cd docs
Fill in the blanks to move these files to the current folder (i.e., the one she is currently in):
$ mv ___/chapter1.txt ___/chapter2.txt ___
Renaming files#
Suppose that you created a plain-text file in your current directory to contain a list of the
statistical tests you will need to do to analyze your data, and named it: statstics.txt
After creating and saving this file you realize you misspelled the filename! You want to correct the mistake, which of the following commands could you use to do so?
cp statstics.txt statistics.txtmv statstics.txt statistics.txtmv statstics.txt .cp statstics.txt .
Moving and copying#
Assuming the following hypothetical files,
what is the output of the closing ls command in the sequence shown below?
$ pwd
/Users/amira/data
$ ls
books.dat
$ mkdir doc
$ mv books.dat doc/
$ cp doc/books.dat ../books-saved.dat
$ ls
books-saved.dat docdocbooks.dat docbooks-saved.dat
Copy with multiple filenames#
This exercise explores how cp responds when attempting to copy multiple things.
What does cp do when given several filenames followed by a directory name?
$ mkdir backup
$ cp dracula.txt frankenstein.txt backup/
What does cp do when given three or more filenames?
$ cp dracula.txt frankenstein.txt jane_eyre.txt
List filenames matching a pattern#
When run in the data directory of your project directory,
which ls command(s) will produce this output?
jane_eyre.txt sense_and_sensibility.txt
ls ??n*.txtls *e_*.txtls *n*.txtls *n?e*.txt
Organizing directories and files#
Amira is working on a project and she sees that her files aren’t very well organized:
$ ls -F
books.txt data/ results/ titles.txt
The books.txt and titles.txt files contain output from her data
analysis. What command(s) does she need to run
to produce the output shown?
$ ls -F
data/ results/
$ ls results
books.txt titles.txt
Reproduce a directory structure#
You’re starting a new analysis, and would like to duplicate the directory structure from your previous experiment so you can add new data.
Assume that the previous experiment is in a folder called 2016-05-18,
which contains a data folder that in turn contains folders named raw and
processed that contain data files. The goal is to copy the folder structure
of 2016-05-18/data into a folder called 2016-05-20
so that your final directory structure looks like this:
2016-05-20/
└── data
    ├── processed
    └── raw
Which of the following commands would achieve this objective? What would the other commands do?
# Set 1
$ mkdir 2016-05-20
$ mkdir 2016-05-20/data
$ mkdir 2016-05-20/data/processed
$ mkdir 2016-05-20/data/raw
# Set 2
$ mkdir 2016-05-20
$ cd 2016-05-20
$ mkdir data
$ cd data
$ mkdir raw processed
# Set 3
$ mkdir 2016-05-20/data/raw
$ mkdir 2016-05-20/data/processed
# Set 4
$ mkdir 2016-05-20
$ cd 2016-05-20
$ mkdir data
$ mkdir raw processed
Wildcard expressions#
Wildcard expressions can be very complex, but you can sometimes write
them in ways that only use simple syntax, at the expense of being a bit
more verbose.
In your data/ directory,
the wildcard expression [st]*.txt
matches all files beginning with s or t and ending with .txt.
Imagine you forgot about this.
Can you match the same set of files with basic wildcard expressions that do not use the
[]syntax? Hint: You may need more than one expression.Under what circumstances would your new expression produce an error message where the original one would not?
Removing unneeded files#
Suppose you want to delete your processed data files, and only keep
your raw files and processing script to save storage.
The raw files end in .txt and the processed files end in .csv.
Which of the following would remove all the processed data files,
and only the processed data files?
rm ?.csvrm *.csvrm * .csvrm *.*
Other wildcards#
The shell provides several wildcards beyond the widely used *.
To explore them,
explain in plain language what (hypothetical) files the expression novel-????-[ab]*.{txt,pdf} matches and why.
Key Points#
A shell is a program that reads commands and runs other programs.
The filesystem manages information stored on disk.
Information is stored in files, which are located in directories (folders).
Directories can also store other directories, which forms a directory tree.
pwdprints the user’s current working directory./on its own is the root directory of the whole filesystem.lsprints a list of files and directories.An absolute_path specifies a location from the root of the filesystem.
A relative path specifies a location in the filesystem starting from the current directory.
cdchanges the current working directory...means the parent directory..on its own means the current directory.mkdircreates a new directory.cpcopies a file.rmremoves (deletes) a file.mvmoves (renames) a file or directory.*matches zero or more characters in a filename.?matches any single character in a filename.wccounts lines, words, and characters in its inputs.mandisplays the manual page for a given command; some commands also have a--helpoption.
Acknowledgments and License#
This section has largely been taken from Research Software Engineering with Python: Building Software that Makes Research Possible github by Damien Irving, Kate Hertweck, Luke Johnston, Joel Ostblom, Charlotte Wickham, and Greg Wilson under at a Creative Commons Attribution 4.0 International License (CC-BY 4.0).